Dr.
Gutow's Tools for Authoring Jmol Web Pages
| Introduction |
Jmol
Tutorial, including making web pages ( English, English,  Español ) Español ) |
Example
Pages |
| Download Jmol |
 Jmol
ColorPicker
WidgetDemo of
some of Jmol's capabilities Jmol
ColorPicker
WidgetDemo of
some of Jmol's capabilities |
=will open
in new window last menu update: June 11, 2010 |
Documentation
for Jmol_Web_Page_Maker
I. IntroductionII. Launching the Program (Only applies to version 1.0. Version 2.0 and greater operate inside of Jmol)
III. Using to Create Pages:
A. where the user
can click buttons to change the view in the Jmol applet.
Buttons and explanatory text scroll next to the applet and the applet
resizes when the window size is changed. (not available in version 1.0)
B. where the initial page displays any number of static images that the user can convert to a live Jmol display. (not available in version 1.0)
C. where the user can choose which orbitals to display on a molecule or atom.
D. where the user has a choice of molecules to display using lists or pop-up menus.
IV. Extending the ProgramB. where the initial page displays any number of static images that the user can convert to a live Jmol display. (not available in version 1.0)
C. where the user can choose which orbitals to display on a molecule or atom.
D. where the user has a choice of molecules to display using lists or pop-up menus.
V. License
Introduction [Back to Table of Contents]
Introduction
Jmol_Web_Page_Maker started as a Java application that provided a GUI (graphical user interface) for choosing molecule and surface files from which to create skeleton web pages containing the Jmol applet and many simple user interface items such as radio buttons and popup menus. It has now been folded into the application version of Jmol as a tabbed dialog accessible in the menus: File -> Export -> Export to Web Page(s)... This allows the user to set up the molecular view as they wish in Jmol and then have the export function generate the skeletal web page and all necessary files. It does not provide a WYSIWYG (what you see is what you get) web editor. These skeleton pages can then be editted in your favorite web page editor, as long as you do not damage the javascript put in to support Jmol. AS OF AUGUST 7, 2007 THIS FUNCTIONALITY HAS NOT BEEN FOLDED INTO THE MAIN RELEASE OF Jmol. UNTIL IT IS I WILL MAINTAIN A DOWNLOAD OF A RECENT VERSION OF Jmol WITH THIS FUNCTIONALITY AT THIS SITE AND CALL IT Jmol_XX.X.X_JWM.
The program is designed to have additional web page format choices added by adding a new class that contains an appropriate web page writer. If you are interested in adding a new page writer, please see the instructions for extending the program.
I am distributing this program under the GNU general public license. If people help and the program becomes more polished it might make a useful plugin for the Jmol application itself.
What happened to Orbtials_to_Web and MacMolPltGridtoCube?
Jmol_Web_Page_Maker replaces my previous Java and perl applications for creating pages with orbitals. These older applications and the java tool for converting MacMolPlt grid files to Gaussian .cube files are available here.
Intro last Update: 8/7/07 by Jonathan Gutow [Back to Table of Contents]
Launching the Program (Only applies to version 1.0) (MacOS, LINUX, WINDOWS) [Back to Table of Contents]
MacOS: Locate the file Jmol_Web_Page_Maker.jar and double click on it. This will start the java virtual machine and launch the Jmol_Web_Page_Maker java application contained in the .jar file.
LINUX: You must have a java virtual machine installed (preferably 1.4.1 or above, JSE 5.0 or greater recommended). You can launch it from the command line or from within your graphical environment.
- From the command line: navigate to the directory containing the file Jmol_Web_Page_Maker.jar. Type: java -jar Jmol_Web_Page_Maker.jar <return> on the command line. This should launch the java application.
- From the graphical user interface double click (or right click and select open...) on the file Jmol_Web_Page_Maker.jar. If you have already associated the command "java -jar" with .jar files the java application should launch. If not you may be prompted for the command line to open the file. Type in "java -jar" as the launch command. This seems to work with gnome, I'm not sure about kde.
Launching last Update: 10/2/06 by Jonathan Gutow [Back to Table of Contents]
Using to Create Pages: where the user can click buttons to change the view in the Jmol applet. Buttons and explanatory text scroll next to the applet and the applet resizes when the window size is changed. (not in 1.0) [Back to Table of Contents]
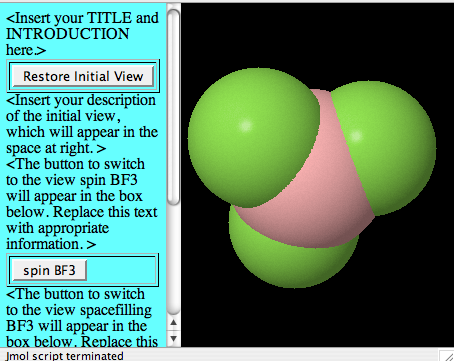
Description - This tab is designed to produce a web page template (no explanatory text) that displays a resizable Jmol with a scrolling pane containing text and buttons next to it. The buttons can change what is displayed in the Jmol applet. What they do can be defined by setting up Jmol with the view you want the user to see. An example picture of such a page is shown below:
Instructions
1) Set the relative path to the Jmol applet on you web site from where you will put the folder (directory) containing the files created by this program. Each "../" means step up one directory level. Do not forget to account for the fact that the page produced by this program is inside a folder (directory) that you will be adding to your web site. Example: Jmol applet is in directory /www/applets/java/jmol and your web site is in the directory /www/yourname. You will be adding one more level for this page (e.g. /www/yourname/thispage). The correct path to the Jmol applet is ../../applets/java/jmol.
2) Set the percentage of the window width that you want Jmol to occupy.
3) Open the first file you want to appear in your page using the File..Open.. menu in the Jmol viewer.
4) Zoom, rotate, select, change colors, add orbitals, set the molecule spinning or what ever you want to do.
5) Click on the "Add Present Jmol State as Instance" button.
6) Repeat for as many different displays as you wish. A button will be added to the web page that will create each display when the user clicks on them. You do not need to load a new file each time if you are just modifying the way the previous one is displayed.
7) When done click on "Save .html as..". Provide a name without an extension. This will be used for the directory in which all the necessary files will be created. The .html file will be in this directory, have the same name, but with the extension .html.
8) Open the .html file in your favorite web editor and add you explanatory text and anything else you wish. As long as you do not alter the inside of the tables where Jmol will be displayed you should be able to change the page without disrupting the JavaScript that controls the behavior of Jmol.
Resizable last Update: 8/7/07 by Jonathan Gutow [Back to Table of Contents]
Using to Create Pages: where the initial page displays any number of static images that the user can convert to a live Jmol display. (not in 1.0) [Back to Table of Contents]
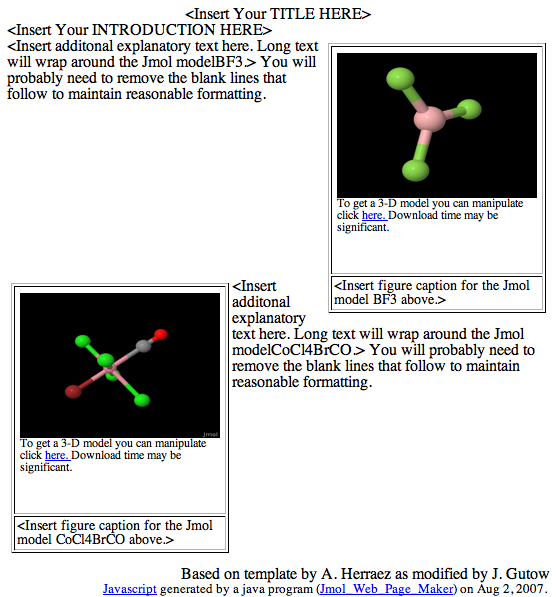
Description - This tab is designed to produce a web page template (no explanatory text) that displays images of Jmol graphics, each of which can be converted to a live Jmol display by the user. This makes initial loading of the page faster. The image and initial Jmol setup for each occurence can be chosen by setting up the Jmol viewer the way you wish. You add the text later in your favorite web editor. An example picture of such a page is shown below:
Instructions
1) Set the relative path to the Jmol applet on you web site from where you will put the folder (directory) containing the files created by this program. Each "../" means step up one directory level. Do not forget to account for the fact that the page produced by this program is inside a folder (directory) that you will be adding to your web site. Example: Jmol applet is in directory /www/applets/java/jmol and your web site is in the directory /www/yourname. You will be adding one more level for this page (e.g. /www/yourname/thispage). The correct path to the Jmol applet is ../../applets/java/jmol.
2) Open the first file you want to appear in your page using the File..Open.. menu in the Jmol viewer.
3) Zoom, rotate, select, change colors, add orbitals, set the molecule spinning or what ever you want to do.
4) Set the size you want this displayed by adjusting the Pixels per side of applet.
5) Click on the "Add Present Jmol State as Instance" button.
6) Repeat for as many different displays as you wish. Because of the memory constraints of web browsers, it is probably best to limit yourself to less than 6 different occurences of Jmol in one web page. If they are very small you can do more.
7) When done click on "Save .html as..". Provide a name without an extension. This will be used for the directory in which all the necessary files will be created. The .html file will be in this directory, have the same name, but with the extension .html.
8) Open the .html file in your favorite web editor and add you explanatory text and anything else you wish. As long as you do not alter the inside of the tables where Jmol will be displayed you should be able to change the page without disrupting the JavaScript that controls the behavior of Jmol.
Pop-in last update: 8/7/07 by Jonathan Gutow [Back to Table of Contents]
Using to Create Pages: where the user can choose which orbitals to display on a molecule or atom. This will give you pages that look like Dr. G's atomic orbital viewer. [Back to Table of Contents]
- Select the tab (panel) for orbitals. You should see a panel
that looks like:
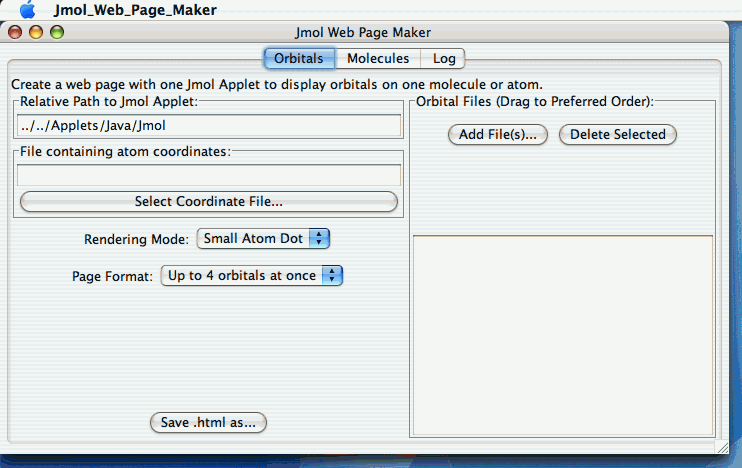
- Fill in the proper relative path
to the Jmol applet on your server. (See
relative paths in the appendix)
- Click on the "Select Coordinate File..." button and select the file that contains the coordinates for the atom(s) in your molecule. It must use the same coordinates as are used to specify the orbital files.
- Select the rendering mode in the "Rendering Mode" popup. The
choices are:
- Small atom dot will use dots of about 0.20 of the vander Waals radius to represent the atom locations. This is most appropriate for displaying orbitals on a single atom.
- Wireframe will use a wireframe representation of the molecule. This is most appropriate for displaying orbitals on molecules.
- Use the page format menu to select the maximum number of separate orbitals that may be selected for simultaneous display. The largest possible maximum is up to four at once (the user can choose fewer).
- Use the "Add File(s)..." button in the Orbital Files section to select the files that contain the orbitals you wish to have available for display. At present this is only verified to work with Gaussian .cube format files, however it should work with the Jmol .jvxl files as well. The files will be arranged in the popup menus in the order they are listed. You may drag them to reorder. If you mistakenly open files you can delete them from the list by selecting them and clicking on the "Delete Selected" button. Two suggestions:
- Use descriptive names for the part of the filename preceding the extension. This will be used as what appears in the popup menu.
- Jmol_Web_Page_Maker deletes all path information. It is assumed that the web page it is creating and all the molecule information files will be stored in the same directory.
- Click the "Save .html as..." button to save the .html file which you can edit in a web editor to add descriptive text. Save the page in the same directory as the molecule and orbital files.
- Edit your page in your favorite web editor. It should be
pretty hard to damage the java script that controls Jmol as it is
contained in parts of the table that you cannot easily edit.
Appendix [Back to Table of Contents] [Back to Table of Contents]